
Recently I invited some girlfriends over for a Crafty Girl's Night, so I was in need of a new project. I turned to Pinterest for inspiration, and my eyes landed on this beautiful monogram pattern. A plan was forming! You see, I've been wanting to throw a cocktail party ever since my husband and I started learning to make cocktails. I want to go all out -- where guests get all gussied up, nibble on dainty bite-sized appetizers, and talk and laugh over drinks. Wouldn't a set of monogrammed cocktail napkins be perfect for just such an occasion? It was an embroidery project waiting to happen.
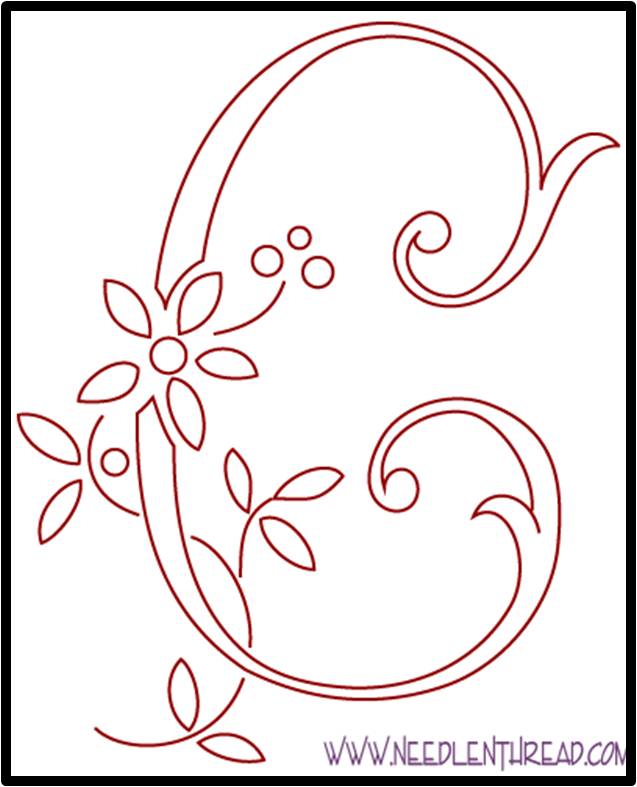
Pattern from Mary Corbert's Needle 'n Thread
Since the napkins are small, each one makes for a quick, fun project. I'll share how I made them! It's a process that could be used for anything: handkerchiefs, towels, tote bags, you name it.
And don't be discouraged if you're new to embroidery -- these tutorials from Wild Olive, a wonderful craft blog, are incredibly helpful. So here goes!
1) Find a Pattern:
First, find yourself a pattern. Needle 'n Thread has an entire index of monogram embroidery patterns (including letters other than "C"). If monograms aren't your thing, there are tons of free patterns available online, or browse through patterns for purchase on Etsy.
2) Gather Supplies:
Once you pick out a pattern, here's what you'll need to get started:
Printed out pattern
Sharpie pen
Scissors
4" Embroidery Hoop
Cloth Cocktail Napkins
Water Soluble Pen
Tapestry Needle, Size 22 or 24 (tips on choosing needle types and sizes)
DMC Embroidery Floss
3) Pick Floss Colors:
I used the following embroidery floss colors, but you can use whatever colors tickle your fancy:
Letter: 469 - Avocado Green
Vine: 3345 - Hunter Green Dark
Flower: 926 - Gray Green Medium
Flower center and dots: 729 - Old Gold Medium
4) Trace The Pattern:
To trace the pattern, print it out (sized to fit the napkin), outline it with a Sharpie (optional, but I find it helps it show up through the fabric), and lay it underneath the fabric. Trace it onto the napkin using a water soluble pen.
If you can't see your pattern through your fabric, try holding it up against a lit window. Once your pattern is traced, it's time to put the fabric into the hoop and start stitching!

5) Start Stitching
Stitch the Letter C:
Using 2 strands of green floss, outline the letter "C" using the Back Stitch technique.
(Note: Embroidery floss is made up of six strands, and you can vary how many strands you use to create thicker or thinner stitches. For larger projects, I frequently use all six strands, but here I chose two strands for a thinner, daintier finished product.)
Stitch the Vine:
For the vine, I used 2 strands of dark green floss to Back Stitch along the vine and around the leaves, and I used a Fill Stitch to fill in the leaves.
Stitch the Flower:
I opted for a lovely blueish-grey floss for the little flower. Using 2 strands of floss, Back Stitch around the petals. Then fill in the center of each petal using a Fill Stitch.
Stitch the Flower Center and Dots:
Almost done! For the finishing touch, I used all 6 strands of a pale yellow floss to make French Knots at the center of the flower and for the little dots.
(Note: French Knots were a little tricky for me to get the hang of, so if you're new to them, try doing a few practice knots on a separate piece of fabric. Once you get the hang of it, they're a cinch. Here's a video tutorial that I found particularly helpful, though I don't bother using a separate needle for my knots.)
6) Rinse
You're finished stitching! To get rid of the blue ink, remove the napkin from the hoop, and run cool water over it until it all of the ink disappears. Once the fabric dries, you have yourself a lovely personalized cocktail napkin.

i would like to commission a set of these with "G" - if you please!
ReplyDeleteI'll have to keep that in mind. :)
Delete